
In previous articles I have covered the cutting and preparing of wood for turning on a lathe. Now its time to move on, and this article covers mounting on a wood lathe with chuck. The mounting of wooden blanks for lathe turning seems a pretty rudimentary topic. Possibly so mundane its not worth mentioning. Ultimately what’s important, and where I want to get to, is mounting wood on a lathe for small opening natural edge vessels. If your familiar with the basics then go ahead and jump to the section on jam chucking.
 I primarily turn sculptural hollow vessels and turned wooden urns and these are the techniques I use every time I turn one of these projects. Since small opening vessels are more difficult to turn I am going to cover the basic methods for attaching blanks to my wood lathe with chuck and move to less obvious mountings. I also use a wood lathe with chuck for shaping and turning vessel bottoms.
Mounting Wood between centers
Most projects start off turning between centers, rather than using the wood lathe with chuck combination. That is the wood is mounted between the head and tailstock of the lathe. The turning blanks are always out of balance and its safest to turn between centers until the blank is turned true. There are a few turning forms turned outboard or at the end of the lathe. In these cases, they are more than often mounted with a faceplate from the onset.
Main Types of Mountings for Wood Lathes
Drive centers – 2,4, multi prong centers, spur drives, etc.
 Every wood lathe comes with a drive center, that is an attachment that fits in the morse taper on the headstock. Typically, this is a 4 prong center (1″ drive and mini prong center). There are a number of other drives though – 2 prong centers in multiple sizes, multi prong centers (1″ and 5/8″ drives), spur drives, etc.
I primarily use a multi prong center as I most often use a paddle bit in a drill to start the mounting point. Since I turn small opening vessels the multiprong center gives me the most flexibility as its diameter is smaller than most drive centers. My center is about ¾” diameter and my other drive centers are 1-1/8” to 1-1-4” diameters. Multiple teeth I find give a better bite which I find useful for spindle turning.
This is the drive that I grab for turning spindles and cremation urns. It’s a straight forward approach in spindle turning. I glue in threaded inserts on my turned wooden urns, the smallest of which is approximately 1-1/8” in diameter. My 4 prong centers are too large for this task.
Tailstock live centers
 The tailstock is other end of mounting between centers and like headstock attachments there are a number of options for the tailstock. Typically, there are multiple tips that fit in the live center bearing head. Tailstock centers are often referred as a live center, meaning it rotates with the piece, otherwise it’s called a dead center, i.e. non-moving. Most manufacturers tailstock centers are just a single point and I would suggest upgrading to a cup center of some form. There are various styles, but in general it’s a single point with a circular cup around the drive point. This increases the surface area on the tailstock side and is less prone to tearing away.
 I turn on a Nova DVR (the Nova Orion DVR, is the latest equivalent model) and as such I stayed with the manufacturers upgraded line of tail stock attachments. If I recall correctly I upgraded the tailstock center after the stock live center bearing went bad. Most manufacturers make similar product for their lathes. The vast majority of things I turn I use the cup center in the tailstock.
Spindle Thread Size
Before we get to the screw chuck lets talk about lathe spindle thread. That is the tpi (tooth per inch) and the diameter of the spindle in the lathe headstock. Any item that screws onto the headstock (i.e. 4 jaw chuck, faceplate, screw chuck, etc.) needs to match the size and tpi of your lathe.
My lathe, and most of all the other full size lathes (Nova, Laguna, Jet, Powermatic, Harvey, Robust, etc.) use a 1-1/4″ x 8tpi spindle thread. Oneway and Vicmarc lathes use a M33x3.5 spindle thread. There are adapters of about every size if you have equipment that doesn’t match your spindle thread. For the purposes of this article all the equipment I recommend uses the 1-1/4″ x 8 tpi size as that is the most common.
Other Lathe Chuck Type – Screw Chuck – Used to Attach Bowl Blanks
I use screw chucks for roughing bowl blanks. The idea is to drill a pilot hole whos diameter is slightly less than the treads of the screw chuck. The screw chuck screws into the pilot hole. There are two main types of screw chucks. One being, and the one that I prefer, is an all in one attachment that screws onto the headstock. The other is a screw attachment that fits in my 4 jaw Nova lathe chuck. Both basically operate the same way.
 To attach a blank, I put the screw chuck on the headstock and turn the lathe to the lowest rpm setting. I then take the bowl blank with the pilot hole and press it against the threaded end of the screw chuck. Let the blank go when it threads all the way up.
Also use the tailstock in conjunction with the screw chuck as its not uncommon for the blank to become wobbly when the treads strip. This is a lot more common on softer woods.
I turn bowl bottoms with a tenon for 4 jaw lathe chuck mountings using this method of mounting, as it is quick and secure. It has better holding strength than a drive spur and is quicker than mounting a faceplate for larger diameter and heavy bowl blanks.
Wood Lathe Faceplate Mounting
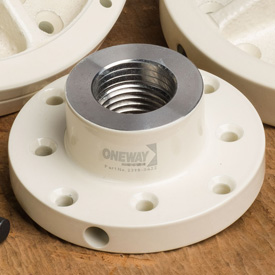
Faceplates are the most secure method for mounting wood on a lathe. Better than the wood lathe with chuck setup from a holding power point of view. As the name suggests is a hunk of metal roughly in the shape of a plate that screws onto the headstock. There are number of holes in the faceplate that allow you to screw the faceplate to the wooden blank. Faceplates come in various diameters and the manufacturer often only includes a small 3” size with the lathe. A 4″ faceplate and a 6″ faceplate will cover you for most things, and keep in mind your lathe’s spindle thread size as the faceplate screws right on to the headstock.
 In my opinion, faceplate mounting is best for very large projects or ones that are extremely out of balance. Additionally, the screws used are very important. You want to use a screw that bites well, are not brittle, and whos heads are not prone to stripping. Drywall screws are not a good screw to use for mounting with a faceplate. Faceplate screws also tend to be short as they will occupy a portion of wood that is not usable.
Faceplate mounting offers the least amount of flexibility to control the shape of a vessel and as such I never use a faceplate. It is true that it allows you to make small openings. However, mounting on a drive spur or in the manner I describe below allows some latitude to reposition blanks while turning between centers. You can slide the blank around (in my method) or alter the tailstock position to turn out less desirable sections in the wood. Once a faceplate is attached or the blank is mounted on the wood lathe with chuck that flexibility no longer exists. I also understand that there are many that don’t share this view. This is just my experience.
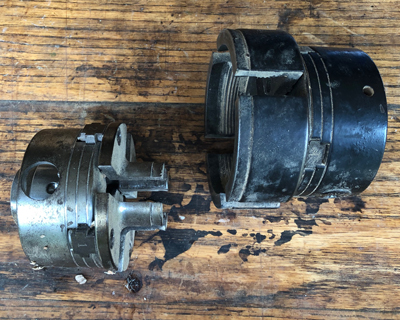
The one faceplate I own is actually attached to an early lathe vacuum chuck coupling that I made which I use as a jamb chuck now. If I made vessels larger than 12” I would consider turning with a faceplate. At that point safety becomes the primary concern and I advocate using a faceplate for large or very off balance work.
Mounting Wood on a Lathe with 4 Jaw Lathe Chucks
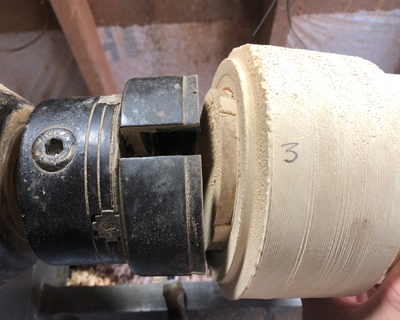
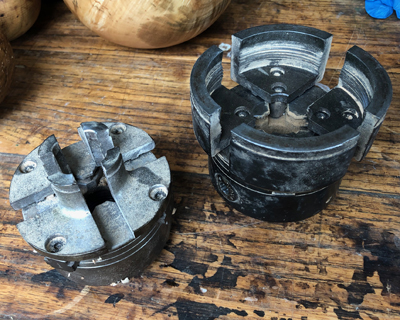 Almost all of my projects use a wood lathe with chuck mounting configuration at some point. A lathe chuck is a device that screws onto the headstock and is designed to hold a piece of wood by either compression on a tenon or expanding to fill a recess. Wood lathe chucks all have 4 replaceable jaws, differing from 3 jaw chucks that are common in metal work. There are a number of different jaw sizes and styles which bolt to the chuck body. The chucks also have different tpi inserts, so get one that fits the tpi of your lathe. The larger chuck in the photo is my Supernova 2 and I have a smaller Nova G3 that I dedicate for cutting threaded inserts for my urns.
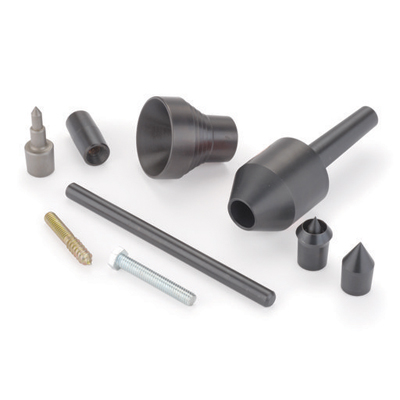
 There are different sizes of chucks basically for holding larger or smaller work, and there are recommendations as far as the types of jaws used for each chuck. I.e. smaller chucks are only recommended to use a certain number of jaw sizes. Larger chucks with larger sized jaws are used mainly for large diameter work. The Protek pack above give a decent spread of jaw sizes.
A blank of wood is mounted between centers and turned to true up the shape. A tenon is created on the bottom of an object. This is essentially an area of the wood that is designed to be “grabbed” by the chuck. Its important to turn a good tenon as inferior ones may cause the object to break or tear away from the chuck on a catch. The chuck is also able to work by expanding into the wood, however I find this method to be inferior. It also leaves jaw marks on the final product which looks unfinished.
Types of Jaws for Lathe Chucking
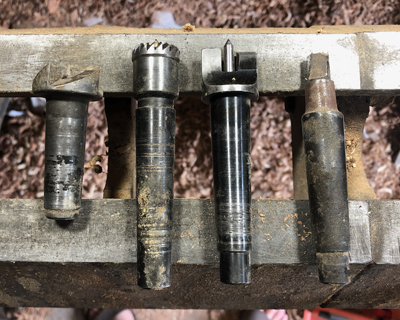
I use a wood lathe with chuck for turning all vessels, bowls, finials, canisters, etc. basically anything other than spindle turning. I use large 5″ bowl jaws for rough turning bowls and deep jaws (power grip jaws) for turning hollow vessels and finished bowls. Deep jaws allow me the flexibility to access a greater portion of the wood blank. Small bowl jaws (2″ jaws usually come with a chuck) for small bowls and pin jaws are good for smaller diameter work.
Lathe Vaccuum Chucks
Lathe Vacuum Chucks are typically used to turn the bottom of finished turned bowls. They are comprised of a vacuum head which attaches to the headstock and vacuum line through the headstock. This has a bearing fitting on the backside of the headstock so that it can connect to a vacuum pump. This is an example of one by Frugal Vacuum Chuck, though there are several other manufacturers. I don’t have any experience operating one so I am not recommending one over another.
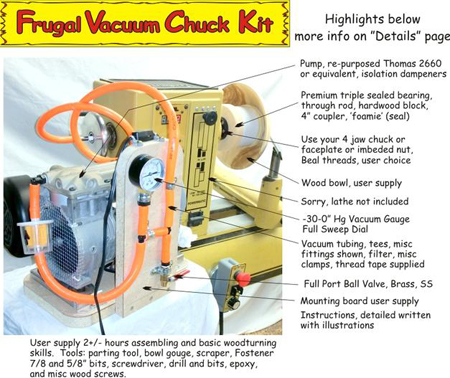
Frugal Vacuum Chuck
The idea is that you put a bowl on the vacuum head and position it with the tailstock so its centered. Pull a vacuum on the bowl and remove the tailstock so bottom of the vessel is turned without any mounting marks. Its probably used most often in bowl turning but there are other applications too.
Vacuum chucks are pricey and I personally have been moving away from bowl turning so I didn’t find the cost worthwhile for me. Additionally, a lot of my vessels aren’t air tight so it makes using a vacuum chuck more difficult. It does greatly speed up production however for those that make lots of bowls. While not for me at this point, it definitely has strong application as a wood lathe with chuck setup.
Specialty Types of Lathe Chuck Mounts
There are a number of other chucks or attachments, i.e Collet chucks, Longworth chucks, Cole Jaws, Eccentric chucks, etc. that make doing certain projects much easier. I don’t have experience in many of these options. I mentioned them so as to make aware that they are available. A Longworth chuck is a neat idea but I never found it to be very reliable or capable of holding a bowl very well. I find the same to be true of Cole Jaws.
I use Jam Chucking for Mounting Wood to a Lathe
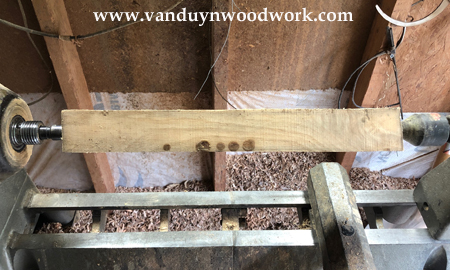
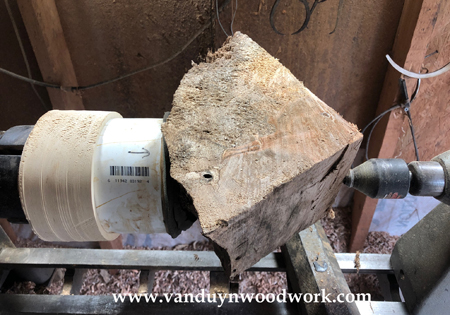 To start off, a bit of caution as this is not the most secure mounting out there. Thus I suggest that other methods of mounting may be more appropriate if your skill level is limited. I don’t want anyone to get hurt so I am sensitive to the arguments that view this as unsafe. Keep in mind I use this mount for vessels with small openings. It accomplishes what I am after and I have had good success with it. That being said you do need to know what your getting into, I don’t want anyone to injure themselves if you go out and try this. Body position and good cutting technique are very important. Catches or being aggressive often cause the blank to move if not come off the lathe. Also start rough at low speeds, I tend to start out around 500 rpm. See the accompanying demo video.
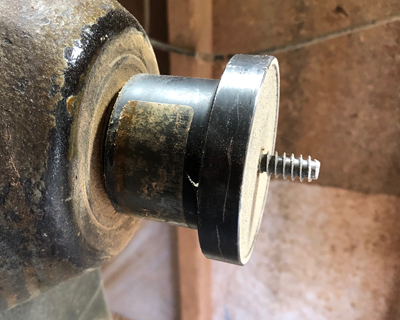
I want to point that this is my method. It may not be something that fits into your tool box, and that’s ok. My viewpoint is that there are several ways of doing things and we should do works best for us. Overall, I have a number of jam chucks that I have made, for vessel turning, I find to be indispensable. The idea of a jam chuck is you sandwich the wood turning blank between the headstock and the tailstock. On the headstock side this is often done by having a scrap piece of wood or some other object that attaches to the headstock. I mainly accomplish this by having a number of jams that fit into my chuck.
As I mentioned previously, I have been working to turn vessels with small openings. I find that objects with small openings and bases to have the most visually pleasing shapes. Currently, I try to make decorative vessels with openings around 10% of the diameter of the object. For example a hollow 5” in diameter has an opening around ½”.
The main problem I ran into was all mounting options for natural edge work left openings created in excess of these small targets. Faceplate mounting is an option but I find that to be difficult in turning smaller blocks of wood and orienting natural edge or irregular shaped blanks. There is also a small diameter two prong drive available, but I ended up snapping that.
 So… I have a series of jam chucks I use for mounting wood to a lathe between centers for the initial truing. I also use these jams for turning finished bowl bottoms. This is actually where the whole concept originated, as I was messing around with making interchangeable heads for a vacuum chuck system. I never got a vacuum system but still have these couplings which I used to help turn bowl bottoms.
How to make a jam chuck
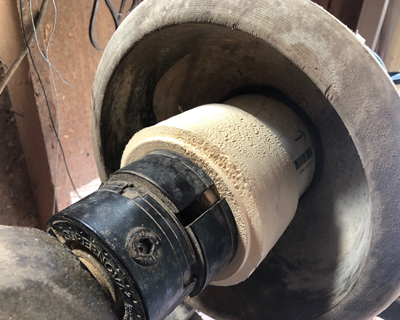
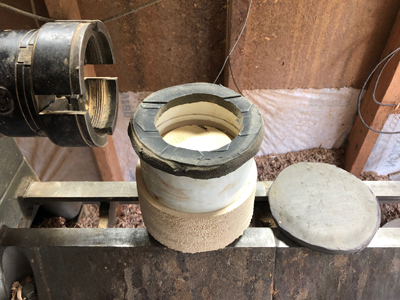
The first one I made was a block of MDF attached to my faceplate that had several steps which receive several sizes of PVC couplings. Most frequently I use a 3″, 4″, and 8″ PVC coupling. Those couplings have a layer of rubber floor mat glued to the outer edge with West Systems Epoxy (Gflex). The steps allowed me to have one base that I could use for multiple coupling/bowl sizes.
 Since then I have made a similar base that I use with my 4 jaw chuck. Mark the base with the corresponding jaw so that it can be indexed any time it is removed. Meaning the compression marks on the base plate tenon line up with the same jaw every time.
The couplings fit on the base by compression and you are making a step that is just slightly larger in diameter than the inside diameter of the coupling. It is also helpful to make the step slightly tapered in order to get the fit just right. This is the basic concept for making any compression fits. I use the same process for canister lid tops and the threaded inserts.
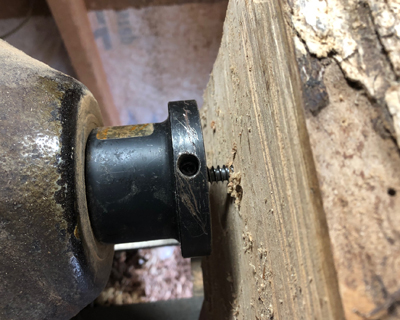
 I use this jamb with another disc of rubber floor mat to jam wooden vessel blanks between the tailstock. The additional layer of padding protects the layer that is glued onto the jam. Natural edge burls for example can really tear up the surface face so this way I don’t have to keep gluing new layers onto the jam.
Where to Stand during Roughing Turning
 It’s not the most secure mounting system for irregular and out of balance blanks so start the RPMs low and work up as the blank is trued up. I use cup centers on the tailstock and make sure there is a flat spot on the bottom of the blank so the cup contacts all of the wood. Additionally make sure there isn’t any wood stuck in the cup center. Most often if a blank comes off the tailstock its because there is wood stuck in the cup center.
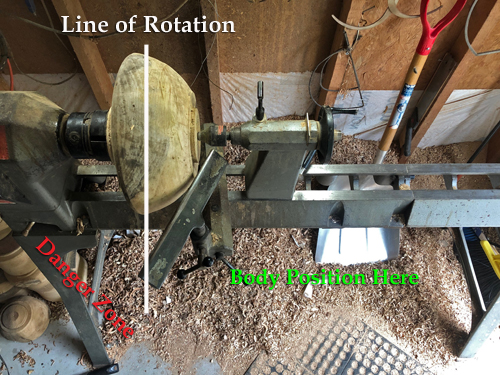
Body position is especially important here too during roughing. In all cases, but especially this one never stand in the line of rotation. Your body position should be by the tailstock, behind the tool rest and working towards the headstock. Occasionally a catch will cause the piece to fly off and if you are standing in the right place it will fly in front of you and/or bounce off the tool rest.
Any time I can use a drive to accomplish the mounting I will do so. So this means that I am only using a jam chuck as a mount for smaller blanks. When the blank gets in the ballpark of finishing out in a dimension greater than 8” I am probably going to be using a multispur drive to mount. The diameter of this drive is going to be smaller than the diameter of the opening, and there shouldn’t be any marks from the drive on the finished piece. I use a ¾” paddle bit for this drive.
Ever heard of a Cup Chuck?
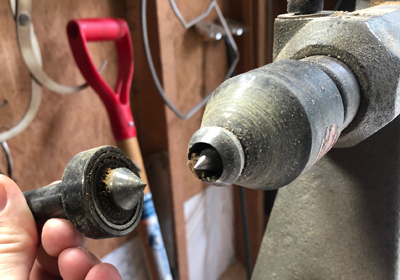
 This is another form of jam chucking but the idea is to have a cup that contours to the outside curvature of an object. You see these typically in making spheres and holding other round objects. This is also what I prefer to use for turning the bottoms of vessels. Early on I used some form of jam similar to that used in turning bowl bottoms.
 I have a headstock that swivels on my lathe and I rotate the headstock out for hollowing. An ideal setup would either to have a short bed lathe or one with a sliding headstock. The main issue this creates is getting a vessel to true back up for turning the bottom. After the headstock has been moved everything needs to be realigned. Before I used a form of a cup jam there was a lot of fiddling with the headstock alignment.
 I have a large series of cup jams that fit into my deep jaw chuck with various diameters and curvatures. The idea is you want a cup that compresses vessel at the vessel’s largest diameter. If the vessel doesn’t fit inside that cup diameter snuggly the vessel will move. This usually requires adjustments to keep the vessel turning true. Contact at the largest diameter section moves the compressive force to the strongest part of the hollow. This is important as its possible to crush the top of the vessel. Particularly if the walls are thin, the wood is spalted, or there are voids in the wood.
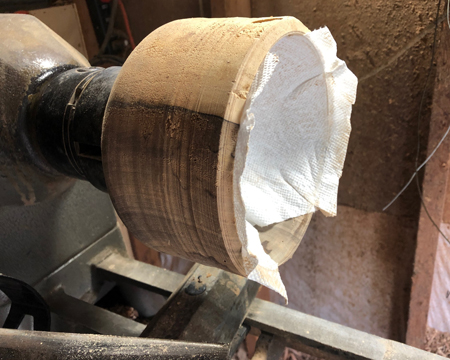
If the cup doesn’t hit in the right spot or curvature isn’t right its usual to compress the wood. This leads to a indention ring that needs scraping and sanding off the lathe. To remedy this I turn my cups just slightly larger in diameter. With the extra space, a ring of paper towel is positioned between the cup jam and the vessel. Using this method I almost never have to make headstock adjustments and the vessel almost always runs exactly true.
Tools and Components for My Wood Lathe with Chuck Configurations
PSI 1″ 4 Prong Drive Center
PSI 3/8″ 4 Prong Mini Drive Center
1″ Multiprong Center
5/8″ Multiprong Drive Center
2 Prong Drive Center
Paddle Bits
Nova Live Center System
Nova DVR Orion
Screw Chuck
Super Nova 2 Chuck ProTek – 1-1/4″ x 8 tpi insert
Nova G3 Chuck
Oneway Faceplate – 4″ (1-1/4″ x 8tpi)
Oneway Faceplate – 6″ (1-1/4″ x 8tpi)
Nova Deep Jaws (Power Grip Jaws)
Nova Large 5″ Bowl Jaws
Small 2″ Bowl Jaws – Nova (usually come with the chuck)
Nova Pin Jaws
Cole Jaws – Nova
Rubber Floor Mat
PVC Couplings (3″, 4″, 8″)
West Systems Epoxy (Gflex)